- The Sewing Brew
- Posts
- 👑 SPS' Wide Cowl Neck Women's Sweatshirt: Roadmap included
👑 SPS' Wide Cowl Neck Women's Sweatshirt: Roadmap included
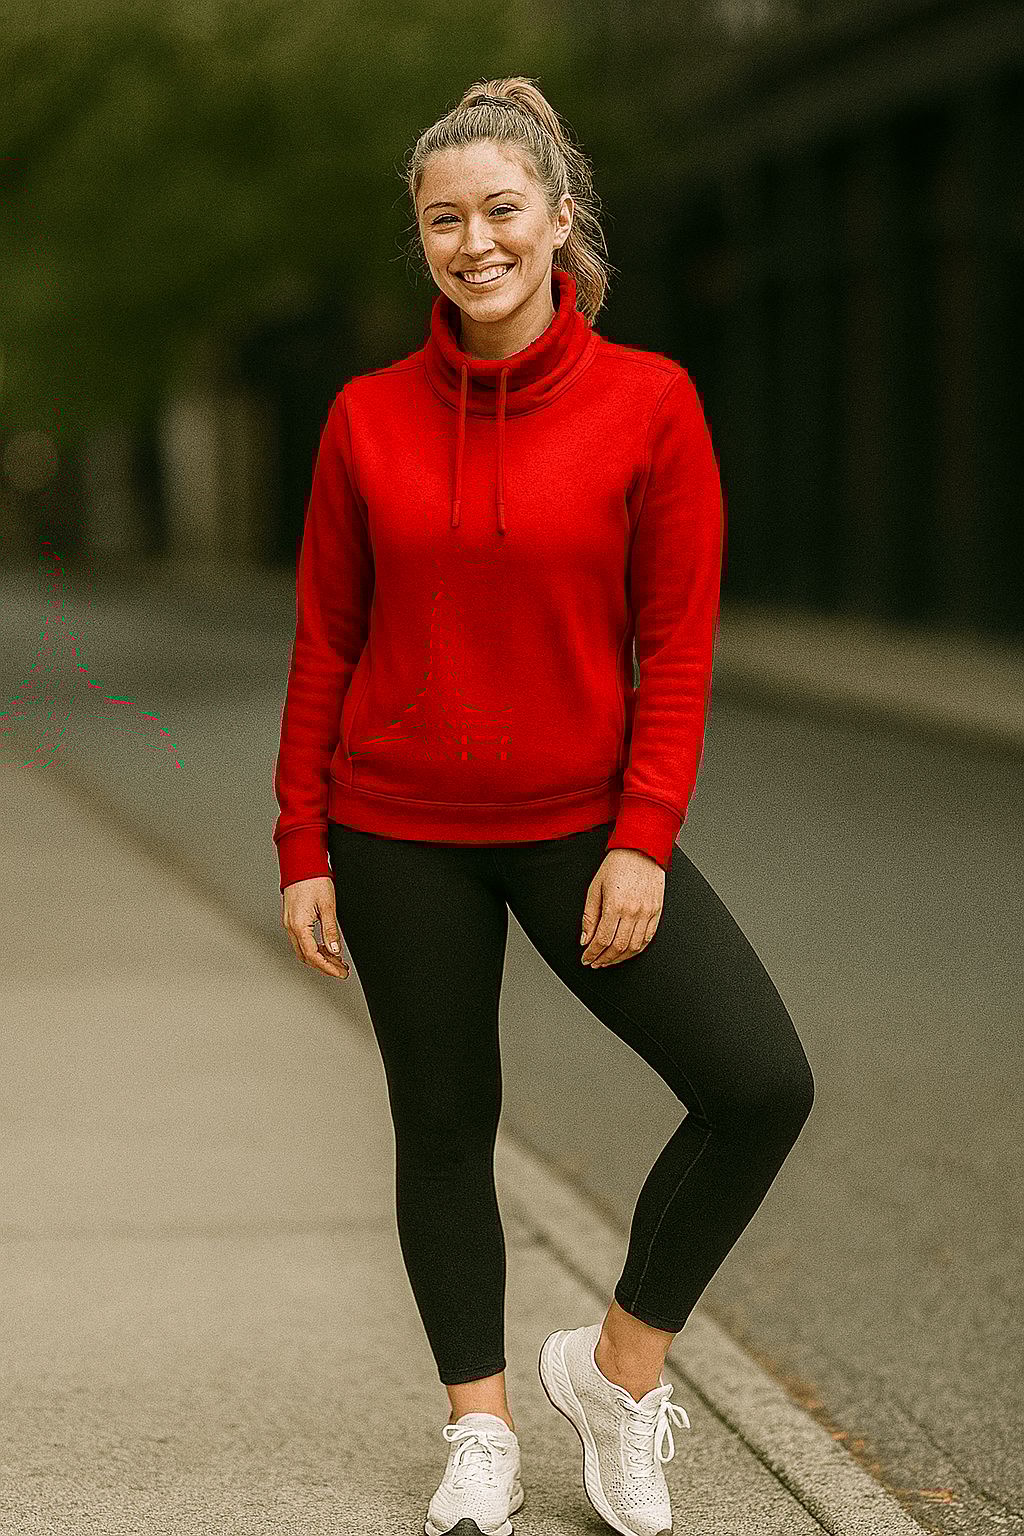
Goodbye boxy sweatshirt. This oversized collar draws the eye upward, while the sleek pockets sculpt the sides.
Marjorie Vaudreuil
January 12, 2026

See the offer
Designer, Co-Author: Rima Bajracharya | Sewing Pattern Secrets | Design Secrets TheSewingBrew.com
The Designer Pick: Lorraine le’ Pull-Over
Most sweatshirts on the rack are designed for one thing: being forgettable.
They’re boxy, shapeless, and made from fabrics that pill after the first wash. You put them on when you don’t want to be seen—not when you want to stand out.
But here’s the truth: a sweatshirt doesn’t have to look sloppy. With the right cut, fabric, and design, it can be just as stylish as your favorite jacket or knit top. That’s exactly what the Lorraine le’ Pull-Over delivers.
This isn’t your average pullover. With its wide cowl collar, drawcord, long sleeves, and cleverly engineered side pockets, it’s an advanced project that rewards you with a garment that feels luxe, modern, and custom-built for your body. It’s the sweatshirt that earns compliments. The kind that makes people ask: “Where did you get that?”
And here’s the kicker—you can sew it yourself.

👗 Pattern Features
Wide cowl collar with drawcord tunnel
Drop shoulder sleeves for comfort and ease
Side seam pockets with panel detail (advanced but worth it)
Long sleeves with cuffs that stay put
Optional mesh stripe/panel inserts for a sporty finish
Please read below for more detailed information about this pattern.
✅ If you’re a Sewing Pattern Secrets Database paid member, log in and start sewing! This one is already waiting for you inside the database.
🚀 If you haven’t grabbed the database yet, now’s the time.
Right now, you can still get lifetime access to 157+ curated patterns, 50+ video tutorials, plus optional ebooks, and planners.
💡 Fabrics That Elevate the Look
Your choice of fabric will make or break this piece. The right one turns it into a designer-worthy garment.
Liverpool Knit → Adds structure and texture, perfect for everyday wear that won’t lose shape.
Rayon Spandex Jersey → Softer and drapier, for a relaxed athleisure look with breathable comfort.
Ponte Double Knit → Creates a polished, structured pullover that doubles as chic streetwear.
Poly Mesh Panels → Use sparingly for inserts or sleeve panels to give it a sporty, athletic edge
✨ Pro Tip: Skip spongy scuba crepe—its stiffness makes the sweatshirt look robotic. Stick with fabrics that have stretch and drape.
Want your pullover to stand out? Try a bold printed rayon spandex as an accent panel or even the main body. For example:
Rayon Spandex Tie-Dye Print (Navy) → Brings a fresh, modern twist to the pullover. Best paired with solid Ponte or Liverpool on the collar and cuffs for balance.
✨ Pro Tip: Use prints for the front body or sleeves, then ground the look with solid fabrics for structure. This combo keeps the design intentional—not overwhelming.


✂️ Pattern Hacks Power Tips
This isn’t just one pattern. It’s a blueprint you can personalize with the easiest tweaks imaginable. No advanced drafting needed — just smart sewing.
Contrast Panels: Use mesh or stripes or color-block inserts on sleeves for a sport-luxe look.
Tunic Version: Lengthen into a tunic and wear with leggings.
Cropped Version: Shorten the hem and pair with high-waist joggers.
Drawcord Upgrade: Swap the drawcord for a satin ribbon for an unexpected feminine twist.
Pocket Remix: Swap seam pockets for kangaroo style for casual streetwear.
These small adjustments multiply the life of your pattern without complicating the sewing.
👉 Want to go deeper into pattern adjustments and couture sewing? Inside our Design Secrets community, you’ll find whole courses on pattern adjustments — from neckline adjustment to dart manipulations to style-line transformations. It’s where sewists sharpen their skills, share hacks, and turn “one pattern” into dozens of wardrobe possibilities.


🌟 Style Moves That Make It Look Intentional
The Lorraine le’ Pullover is designed to blur the line between loungewear and streetwear, making it one of those rare pieces that feels at home whether you’re running errands or meeting friends for coffee. For a polished, casual vibe, pair it with slim-fit bottoms like the Women’s Compression Leggings from the SPS Database and finish with a pair of sleek sneakers that deliver both comfort and style. Minimal accessories—like a structured tote or crossbody—keep the look intentional without taking away from the cowl collar’s statement.
🗺️ Sew-Along Roadmap: Scrunchie Neck “Le Lorraine” Pullover
A sleek, modern knit pullover with a soft scrunch neckline that frames the face and gives couture comfort a designer edge. Recommended for advanced sewists or confident intermediates ready to level up — a serger is strongly advised to achieve the smooth, professional finish this design deserves.
🧭 Project Planning
⏳ 2 hours prep
(includes printing pattern, testing stretch direction, sourcing knit yardage, threading serger, prewashing, and cutting all pieces)
⏳ 4–6 hours sewing
(broken into four focused sessions — yokes, sleeves, collar construction, assembly, and finishing)
📅 Suggested Workflow
📅 Day 1: Print pattern + prepare fabric and notions
📅 Day 2: Cut pattern pieces + apply interfacing where indicated
📅 Day 3: Join yokes + assemble sleeves
📅 Day 4–5: Construct collar and bodice join
📅 Day 6: Finish hems, waistband and final press
✅ Prerequisite Checklist Before You Begin
Printed correct size from the SPS database
Tested serger stitches on fabric scraps (4-thread overlock recommended)
Sewing machine + ball-point or stretch needle ready
Fabric pre-washed and grain direction confirmed
Downloaded and filled out Size Tracker PDF
Watched Design Secrets Fine Sewing: Knit Finishes & Stretch Seams
Marking tools, seam gauge, pressing cloth, and ironing station prepped
Optional coverstitch machine or twin needle for topstitching
Matching thread + 3–4 bobbin fills
½ yd lightweight fusible interfacing (for neckline and collar facing stability)
✂️ Step 1: Fabric Selection
Main Fabric: Medium-weight stretch knit such as cotton spandex, ponte roma, French terry, or athleisure double knit with 30–40 % stretch recovery.
Contrast Option: Yoke or collar may feature a textured knit (rib or pique) for dimension.
Lining (optional): Lightweight tricot for added stability in the collar.
Other: Fusible interfacing for neckline area if fabric is lightweight or slippery.
🧵 See the suggested fabric list in the article above for styling ideas and fiber notes.
📏 Step 2: Know Your Sizes
Determine bodice size by bust measurement and check hip for waistband fit.
Use blending techniques if between sizes (see The Blender module in Design Secrets).
Review finished-measurement chart to confirm desired ease for layering.
Record all final sizes on the downloadable Size Tracker PDF.
✂️ Step 3: Cut All Pieces
Cut main fabric for front bodice, back bodice, front and back yokes, sleeves, cuffs, waistband, and collar pieces.
Cut interfacing for neckline facing or collar stabilization.
Mark all notches and match points for yoke alignment and scrunch placement.
Use a rotary cutter and weights for precision on stretch knits.
Press interfacing onto designated areas before assembly.
🧵 Step 4: Construction Overview
Here’s the 🗺️ Sew-Along Construction Roadmap broken into four structured sessions. Each session fits into 90 minutes or less and is designed for advanced sewists using a serger for main seams and a standard machine for topstitching and detailing.
🧵 Session 1: Yokes & Foundations
Estimated Time: 60–90 min
Join front and back yokes to their respective bodice sections (serge or stretch stitch) – 25 min
Press seams downward and topstitch (optional) – 10 min
Assemble shoulders and stabilize neckline area – 20 min
Join sleeve caps to armholes (flat method recommended before closing side seams) – 25 min
💡 Note: Unlike woven blouses, this design does not use a burrito roll method — the clean finish comes from precise serging and pressing of the yoke seams.
✂️ Total Time: ≈ 80 min including pressing and pinning
🧵 Session 2: Sleeves & Side Seams
Estimated Time: 75–90 min
Serge side seams and underarm seams in one continuous pass – 30 min
Press and flatten seam allowances – 10 min
Construct and attach cuffs to sleeve ends using the quartering method – 20 min
Fold each cuff piece wrong sides together lengthwise.
Mark quarter points on both cuff and sleeve hem.
Stretch cuff slightly to align quarter marks while serging to sleeve edge.
Press seam allowances toward sleeve; optional coverstitch or twin-needle topstitch for a ready-to-wear finish.
Optional coverstitch topstitch along side seams for sporty structure – 15 min
✂️ Total Time: ≈ 75 min
🧵 Session 3: Scrunch Collar Magic
Estimated Time: 90 min
Fuse interfacing to collar pieces and press – 10 min
Stitch collar center back seam – 5 min
Fold collar in half lengthwise and press – 5 min
Insert elastic or drawstring channel depending on variation – 20 min
Gather or “scrunch” collar to fit neckline opening – 25 min
Attach collar to neckline with serger, matching quarter marks – 25 min
✂️ Total Time: ≈ 90 min with adjustment and topstitching
🧵 Session 4: Waistband, Finishing & Final Press
Estimated Time: 60–75 min
Construct waistband (loop and fold method) – 15 min
Attach to bodice bottom and serge – 20 min
Press waistband seam toward bodice and topstitch (optional) – 10 min
Final press of entire garment with press cloth – 10 min
Clip threads and inspect stitches – 10 min
✂️ Total Time: ≈ 75 min
🚫 Step 5: Finishing Notes & Serger Tips
✅ Use a 4-thread overlock for main seams and a 3-thread narrow finish for collar and cuffs.
✅ When pressing knits, use a press cloth and avoid stretching while hot.
✅ Test stitch balance before assembly to avoid waviness.
✅ Use a stretch needle (75/11 or 80/12) and poly thread for durability.
✅ Optional: Topstitch with a twin needle for ready-to-wear look.
✨ Your Scrunchie Neck “Le Lorraine” Pullover is a modern wardrobe hero — soft, structured, and beautifully finished thanks to the serger’s precision. Enjoy wearing your designer-level results with pride!
This isn’t a “hide at home” sweatshirt. The Lorraine le’ Pull-Over earns its place outside:
Weekend Chic: Pair with slim joggers, crisp white sneakers, and a sleek ponytail.
Coffee Run: Style with compression leggings, statement shades, and a designer tote.
Travel Ready: Layer over a fitted tee, add cropped jeans, and carry a crossbody for effortless movement.
Date Night Casual: Throw it over a faux-leather skirt with ankle boots for a chic, unexpected twist.
Work-from-Home to Out-the-Door: Wear with soft knit culottes indoors, then swap for heeled boots to step out.
✨ One pattern, endless style energy—from the gym to the street to your favorite café.
💌 A Thoughtful Note to Inspire Your Next Stitch
The Lorraine le’ Pull-Over may be labeled “Advanced,” but that’s what makes it rewarding. It pushes your sewing skills just enough to give you a piece that feels professionally made.
Sewing is about more than filling your closet—it’s about creating garments that make you proud every time you wear them. This sweatshirt does exactly that.
Happy Sewing,
Rima
More Brewing


More from Sewing Pattern Secrets
Design Secrets Offer: See the Offer Here
Design Secrets Log in: Log Into the Paid Course and Community Here
Existing Members: Access your Paid Library Here
Existing Members: Sign into your Five Free Pattern Access
Sign up for Access to the Five Free Pattern Mini Sampler Site Here
How to Print Our Patterns Blog Article
Want to see more about what is INSIDE the database? Peek INSIDE NOW
Terms & Conditions/ Affiliate Disclosure:
This email is being sent to you because you either opted in to receive updates, resources, or special offers from us, or previously interacted with our website or digital properties. We value transparency and only send messages to subscribers who have requested or expressed interest in receiving content related to https://sewingpatternsecrets.com
We do not engage in unsolicited email practices. If you no longer wish to hear from us, you can unsubscribe at any time using the link below. No hard feelings. All information provided herein is for educational and informational purposes only. Results mentioned are not typical and will vary based on individual effort, experience, and application.
We do not make any guarantees regarding financial outcomes or business performance. This email may contain affiliate links. That means if you purchase through one of our links, we may earn a small commission—at no extra cost to you. It helps support the free content we share. By continuing to engage with our emails, you agree to our full terms and privacy policy available on our website.Thank you for being part of our community.
Reply